Showing posts with label CRAFT. Show all posts

Monday, September 12, 2016

Kid Craft: Baby Owls

How cute are these little big-eyed babies?! I love them!
This simple Baby Owl Craft is an easy way to add a touch of autumn to your home.

Here’s a list of supplies you’ll need,
most of which are probably in your house right now!
– cardboard tubes (empty toilet paper rolls to be exact)
– cupcake liners (just 2 per owl). Wilton has some fresh and unique designs!
– scrap paper (not much; just enough for the eyes and beak)
– scissors (again for the eyes and beak)
– a hot glue gun (good old Elmer’s glue works too, just not as quickly)
1- Start by folding in the top of the tube.
2- Add a drop of glue to one side to keep your fold in place.
3- Fold 1 cupcake liner in half.
4- Glue it to the back of the tube to create the wings.
5- For outstretched wings, cut a cupcake liner in half.
6- Glue each half on the back of the tube at a slight angle.
7- Cut another cupcake liner into thirds. Trim off the flat base so only the ruffles remain.
8- Glue each ruffle, starting at the bottom of the tube, to cover the tube with “feathers”.  Add eyes and a beak and Viola!
Happy Fall, y’all!
This was originally posted on East Valley Mom Guide.
 post signature

Tuesday, January 20, 2015

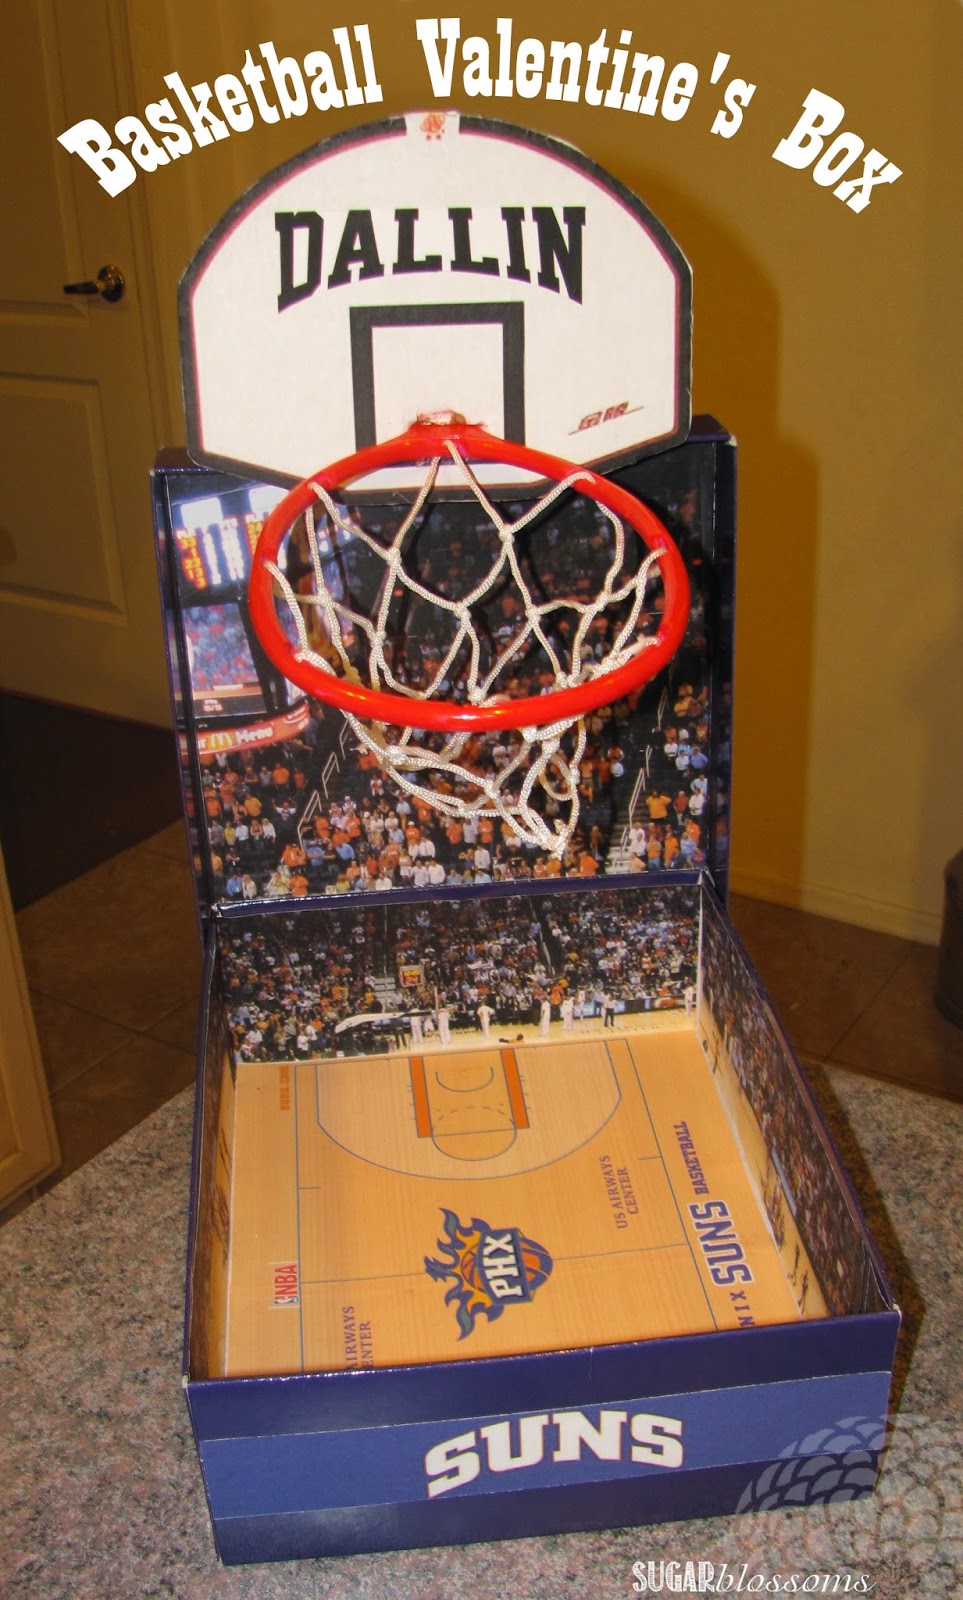
Basketball Valentine's Box

This basketball themed Valentine's box is so easy to make!
It's even easier than the Minecraft box we made a couple years ago.
 
My boys aren't big into Valentine's Day but this box
{used to hold all the cards and candy being handed out by classmates}
actually won an award and was pictured in the yearbook!
We used the Phoenix Suns colors and layout since we live in Arizona.
 
1 - I started with a shoebox - I happened to have a purple one on-hand.
 
2 - Then we Googled images for the floor ("Phoenix Suns court"), the audience ("Phoenix Suns fans"), and the scoreboard ("Phoenix Suns jumbotron"). My son picked the ones he liked and we printed them to fit the dimensions of the shoebox. We also printed the Suns logo for the outside of the box to cover the shoe info.
 
3 - Next we used hot glue to attach a small basketball hoop we got at the dollar store.
I printed his name on it so his friend's would know which box was his. And that's it!
 
It was a huge hit with kids trying to score points by making their Valentine's for Dallin into the basket. Hope it inspires you and the fellas at your house for the upcoming holiday!
 
post signature

Thursday, December 11, 2014

Frozen Ornament @ EVMG

My post for December is live on East Valley Mom Guide!
Get the full instructions for this Frozen inspired ornament
post signature

Wednesday, December 3, 2014

Frozen-Inspired Snowflake Wreath

This Frozen-inspired candy cane wreath is a simple craft even kids can make!

Anyone that knows me will be shocked to see this post.
Being a mom of only boys, I haven't fallen under the Frozen spell.

However, as I was shopping the other night I was inspired to make this:
Brach has made blueberry candy canes ($1 a box at Wal-Mart) that are a beautiful shade of blue.
I thought of the candy cane wreath I made last year and this idea just hit me!
I couldn't help but think of Elsa; the colors are perfect!
I had to make it.
Plus, I love snowflakes. =)

Here are the simple directions with pictures to help you along:
1 - All you need is a glue gun, 2 boxes of blue candy canes (24 candy canes, total) and some sparkly embellishments (I got mine at Dollar Tree).

2 - Glue candy canes together in sets of that form a heart.

3 - You may want to measure them together before gluing to make sure they match up (notice how different they can be!).

4 - Go back over each connected piece with more glue for stability.
5 - Glue all candy cane sets together until you have 12 hearts.

6 - Place 6 candy cane hearts together to form the outer layer of a snowflake. Glue touching edges together.

7 - Place remaining 6 hearts on top of first layer in a circular fashion. I tried to highlight this second layer in the photo so you can get a good idea of their placement. Glue layers together in ALL the areas that touch (each top layer heart should touch the lower layer in 4 places).
Again, go back over each connected area with more glue for stability.

8 - Add embellishments as desired. I put a small "snowball" on each pointed tip and added a plastic snowflake in the center. Add a length of ribbon to the top for hanging and you're done!
 
It cost me a total of $3.00 and only took 35 minutes to make.

My 10-year-old made one without any help but even if your little ones are a little younger,
{like my little helper}
everyone will enjoy putting this together.
♫♪ "Do you want to build a snowflake?" ♫♪
 
If you'd like something more traditional, try this wreath! 
Let me know how yours turns out!
post signature

Monday, November 24, 2014

Kid's Craft Turkey @ EVMG

My November post is live on East Valley Mom Guide!
How cute are these little guys?!
I hope your turkeys love them as much as mine do.
post signature

Friday, November 21, 2014

Sweet Archives: Thanksgiving Chalkboard Acorns

I was looking through my old posts from this time of year and came across this craft:
Thanksgiving Chalkboard Acorns.
I forgot how much I loved these little beauties!
Check out the full tutorial here.
post signature

Tuesday, September 23, 2014

Baby Owl Craft @ EVMG

I'm guest-posting on EastValleyMomGuide.com again!
Today's post is SO STINKIN CUTE:
DIY Baby Owls.
How cute are these?!
 
They're so easy to make. You can whip up a whole parliament of these in no time!
 Get the full tutorial here.
post signature

Saturday, September 20, 2014

NOW FEATURING @ EVMG - DIY: Money Jar

I get to guest-post on East Valley Mom Guide each month.
Check out my post from August:
a DIY: Money Jar! 
 
You only need a few supplies:
It's a fun way for your kids to create a little something of their own.
Get the full tutorial HERE. 
post signature

Friday, September 5, 2014

Curled Feather Headband

Feathers are so fun!
I like to wear them in my hair every now and then.
 
Here's how I fancify my feathers.
You can curl a feather with one simple tool:
a butter knife.
Seriously, that's it!
Put the blunt edge of a butter knife against the under-side of a feather.
Place your thumb over the knife and "drag" outward
{just like curling a ribbon on a present}.
I whipped out  several in a couple of minutes,
added a fancy button, glued it to a headband . . .
And VIOLA!
Swirls of beautiful feather curls for your noggin. =) 
post signature

Monday, August 25, 2014

Thursday, August 21, 2014

Stick Art Tutorial

I volunteer weekly with a group of young women.
We spend our time trying to improve ourselves, discuss spiritual topics, learn how to bake or sew and laugh hysterically every chance we get!
 
I wanted to do something crafty last time we met and
I found this COOL pic while scrolling through Pinterest.
It was made by a talented woman for a project she was doing but there weren't any instructions.
 :(
{sniff, sniff}
 
So, my girls and I made it up as we went along. =)
 
Here's how we did it.
1- We gathered some sticks and "cut" them to varying lengths using some big wire cutters. Then we arranged them into a heart.
 
2- Starting at the bottom, we wrapped a low-gage wire (I got 3 rolls for $1 at Dollar Tree) around each stick, leaving some space between each tier.
 
3- Once one side was complete, we cut the wire and started at the top of the other half of the heart.
 
4- We painted them any color we wanted with acrylic paint. They dried for 30 minutes before we added a bit of baker's twine to hang them on the wall.
 
That's it!
It was so fun to see everyone's own spin on it.
 
Thanks, Ellen, for inspiring us!
post signature

Wednesday, July 2, 2014

Easy No-Sew Pinwheel Hairbow

Hello Sweeties!
Today I'm bringing you a quick and easy hairbow tutorial:
The Pinwheel!
This literally took me 5 minutes to make!
 
Here's what you'll need:
- 2 coordinating fabrics
- Heat n'Bond
- scissors
- an iron
- glue gun
- a button
- alligator clip

 
Here's how I do it:
1: Cut two coordinating 4-inch squares of fabric and one 4-inch square of Heat n'Bond.
 
2: Place the Heat n'Bond square on the back side of one fabric square; make sure the Heat n'Bond is "rough side" down.
 
3: Iron with NO STEAM for 2 seconds to adhere; trim edges.
 
4: Peel away paper backing of Heat n'Bond.
 
5: Place other piece of fabric, face up, on bonded surface of previous fabric.
 
6: Iron for 8 seconds; trim edges.
 
7: Cut a 1-inch line from each corner toward the center of fabric square.
 
8: Be sure cuts are even.
 
9: Place a small dot of hot glue in center of square.
 
10: Bring in right corners of cut edges and push down onto glue.
 
11: Glue a button in the center.
 
12: Glue alligator clip to the back.
(I add a piece of fabric inside the clip to create a more finished look.)
 
And viola!
Fun, festive, and freakin' cute!
 
Special thanks to Britany at 32 Turns for loaning me a model. =) 
post signature

Monday, May 12, 2014

DIY: Hanging Orbs

 Here's another paper decoration you can craft-up in no time:
Hanging Orbs!
I love making these! I busted out a dozen in no time once I got into a rhythm.
Here's what you'll need:
 I made 2 different sizes. The photos in first 6 steps show the small size; the other steps show the larger one but the steps are essentially the same for both sizes. I'll explain the smaller size first.
 
This is how we do it.
STEP 1: For small orb, cut one piece of 8.5 x 11 paper into 1-inch strips.
STEP 2: Slightly crease one piece in half to find the center.
STEP 3: Stack up the strips and in punch a small hole in the center; make sure it goes through ALL the papers. {I used a nail!}
STEP 4: Cut a 4-inch piece of wire and thread it into 2 holes of  a small button. Twist the pieces of wire together tightly against the underside of the button.
STEP 5: Push the wire through the hole of each strip of paper. Fold the wire over flat on the paper.
STEP 6: Bring the ends of each strip together.
STEP 7: Place a small piece of tape on one end of a paper strip.
STEP 8: Bring the other end of THE SAME strip of paper and tape ends together.
STEP 9: Put a hole through the tape in the middle of the 2 ends.
STEP 10: Continue taping and putting a hole in each strip, nesting them inside the previous strip. 
STEP 11: Thread another button with wire and push it through the hole in each strip of paper.
STEP 12: Fold the wire toward the inside and flatten it.
STEP 13: With one the buttons on opposite ends, you're ready to start separating the strips.
STEP 14: Split groups of strips opposite of each other.
STEP 15: Continue separating strips until you've filled-in all gaps.
STEP 16: Tie a length of fishing wire around one of the buttons and you're finished!
 The large orbs need two 12 x 12 sheets of the same paper, again sliced into 1-inch strips.
Tape 2 strips end to end make the length of the strips double that of the small orb.
Omit Step 2 and continue following the remaining steps. 
 Fun, festive, and fabulous!
post signature