Showing posts with label DECOR. Show all posts

Monday, May 12, 2014

DIY: Hanging Orbs

 Here's another paper decoration you can craft-up in no time:
Hanging Orbs!
I love making these! I busted out a dozen in no time once I got into a rhythm.
Here's what you'll need:
 I made 2 different sizes. The photos in first 6 steps show the small size; the other steps show the larger one but the steps are essentially the same for both sizes. I'll explain the smaller size first.
 
This is how we do it.
STEP 1: For small orb, cut one piece of 8.5 x 11 paper into 1-inch strips.
STEP 2: Slightly crease one piece in half to find the center.
STEP 3: Stack up the strips and in punch a small hole in the center; make sure it goes through ALL the papers. {I used a nail!}
STEP 4: Cut a 4-inch piece of wire and thread it into 2 holes of  a small button. Twist the pieces of wire together tightly against the underside of the button.
STEP 5: Push the wire through the hole of each strip of paper. Fold the wire over flat on the paper.
STEP 6: Bring the ends of each strip together.
STEP 7: Place a small piece of tape on one end of a paper strip.
STEP 8: Bring the other end of THE SAME strip of paper and tape ends together.
STEP 9: Put a hole through the tape in the middle of the 2 ends.
STEP 10: Continue taping and putting a hole in each strip, nesting them inside the previous strip. 
STEP 11: Thread another button with wire and push it through the hole in each strip of paper.
STEP 12: Fold the wire toward the inside and flatten it.
STEP 13: With one the buttons on opposite ends, you're ready to start separating the strips.
STEP 14: Split groups of strips opposite of each other.
STEP 15: Continue separating strips until you've filled-in all gaps.
STEP 16: Tie a length of fishing wire around one of the buttons and you're finished!
 The large orbs need two 12 x 12 sheets of the same paper, again sliced into 1-inch strips.
Tape 2 strips end to end make the length of the strips double that of the small orb.
Omit Step 2 and continue following the remaining steps. 
 Fun, festive, and fabulous!
post signature

Monday, April 28, 2014

DIY: Paper Fans

I've spent the last month prepping, creating, and crafting for my friend Britany's baby shower.
I got together with some of her other friends to put on a Mustache Bash to welcome her little boy.
 
I wanted to share one of the decorations I made for the event:
DIY Paper Fans!
These are SO simple to make but they look awesome!

Here's what you'll need to make 1 large fan:
  • 3- 12x12 pieces of paper (same design/print)
  • glue gun
  • fishing line (optional; for hanging from the ceiling)
1- Start with 3 pieces of 12x12 paper
2- Fold it "accordion style" in 1-inch increments
3 - Fold the entire paper (you may end of with a slightly short or longer piece at the end; it's ok!)
4 - Bring the each end together to meet in the middle.
5 - Crease the center fold well.
6 - Follow steps 1-5 for the remaining 2 papers.
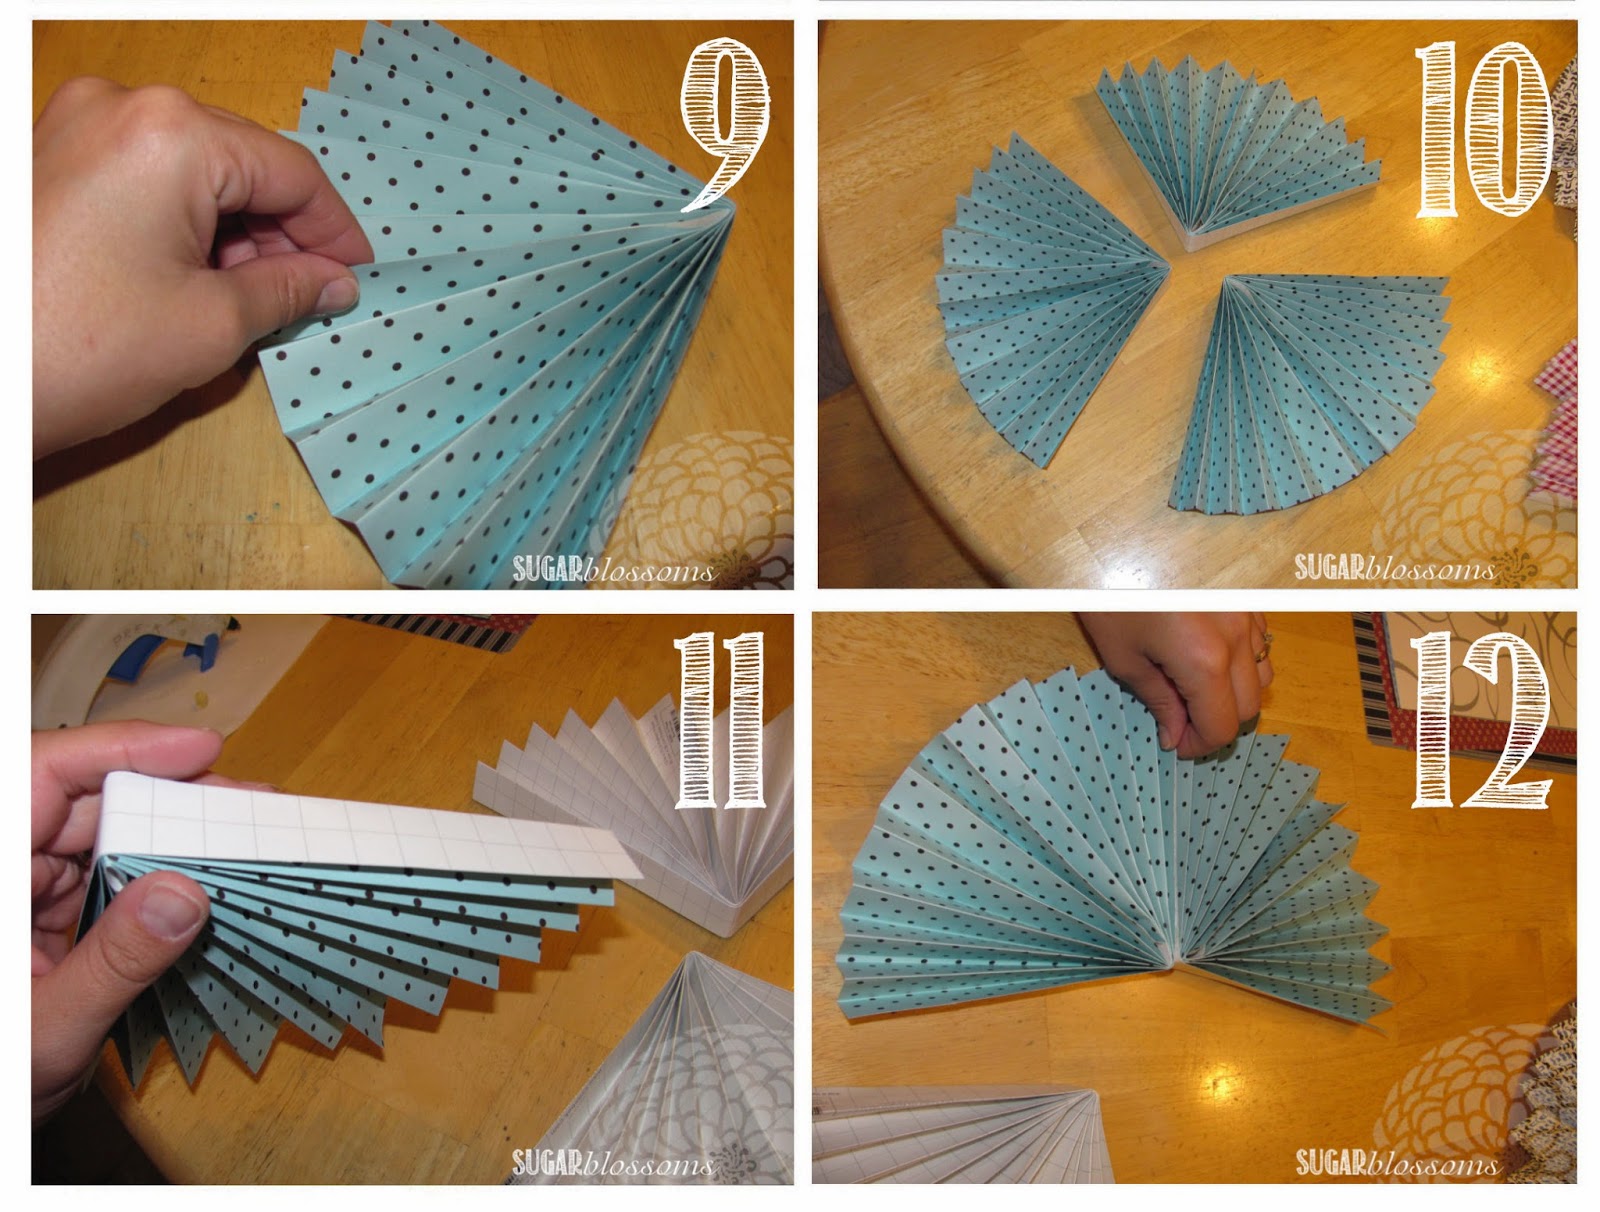
7 - Hold each "fan" by one side so the inner folds are visible.
8 - Place a line of hot glue along the edge and center crease.

9 - Pinch "fan" closed to adhere glue to both sides.
10 - Follow steps 7-9 for remaining "fans".
11- On outer edge of one "fan", pipe a line of glue along top and lower crease.
12 - Attach glued side to outer edge of another "fan".

13 -  Pipe glue along outer edge of last "fan".  Attach it to one side of previously joined "fans".
14 - Pipe another line of glue along top edge and down center crease.
15 - Pinch together to secure.
16 - VIOLA!!
 
For a small fan, you'll need:
  • 1 piece of 12x12 paper
  • hot glue
  • fishing line (optional; for hanging from the ceiling)
Follow the same steps as the large fan, but start with 1/2 inch folds (instead of 1-inch folds). You'll need all four small "fans" to complete this one (vs. 3 "fans" for the large one).
See how easy that was?!
 
I didn't use fishing line on these because we attached them to a backdrop instead of hanging from the ceiling.
Here's a little peek at where we used ours:
How would YOU decorate with these?
post signature

Thursday, December 20, 2012

#CAPTURINGDECEMBER: Day 20

Day 20: "Tree Topper" - We've had this one for years. I love it but I really wish it had lights. /:
#CAPTURINGDECEMBER

Tuesday, December 18, 2012

#CAPTURINGDECEMBER: Day 18

Day 18: "Stockings"- white for boys, red for me, stocking holders: P.E.A.C.E.
#CAPTURINGDECEMBER

Tuesday, August 28, 2012

DIY: "Stained Glass" Window

I work as an assistant teacher in the preschool room at an elementary school.
It keeps me hopping all day! There's never a dull moment in preschool!
 
I've been able to help tune-out some distractions with a SWEET window cover.
I got the idea from FamilyFun.com and tweaked it just a little. =)
 I started out with a BUNCH of tissue paper that I cut into random triangles, trapezoids, etc.
 Then, I used a regular old glue stick and started putting the paper on the window itself.
{The original idea has it on plastic wrap for easy clean-up but I needed something more permanent.
Mine comes off with a little soap and water at the end of the school year.}
 
Here's a closer look:
 
Our door looks pretty cool from the outside!
We get lots of oohs and ahhs from older classes passing by {but without the distraction of seeing them!}.
 I LOVE how it looks inside the room when the sun is shining!
It took a little time and effort but it was well worth it!

Where will you put this?